Saturday, August 27, 2011
My First 2D Pixel Shader(s) - Part 3
This is part 3 of a 3 part series on 2D Pixel Shaders. For part 1 click here, for part 2 click here.
At the end of our last lesson we'd learned a bit about how to modify pixel shaders based on color information and coordinate information. We went through some really cool effects but some of them weren't especially efficient considering all of the conditional statements that it would go through for every pixel every frame.
The primary focus of this part of the series is going to be passing in parameters and at the end I'll go into detail explaining how to do the following:
Passing Parameters
Since starting this series our code has been modified incrementally many times so I'm going to start by presenting a clean PixelShaderFunction and Draw method then I'll describe what's new.
Draw()
GraphicsDevice.Clear(Color.CornflowerBlue);

spriteBatch.Begin(SpriteSortMode.Immediate, BlendState.AlphaBlend);
spriteBatch.Draw(texture, new Vector2(0, 0), Color.White);
effect.Parameters["param1"].SetValue(.7f);
effect.CurrentTechnique.Passes[0].Apply();
spriteBatch.Draw(texture, new Vector2(texture.Width+10, 0), Color.White);
spriteBatch.End();

base.Draw(gameTime);
Effect1.fx
sampler s0;
float param1;

float4 PixelShaderFunction(float2 coords: TEXCOORD0) : COLOR0
{

float4 color = tex2D(s0, coords);

if (coords.y > param1)
    color = float4(0,0,0,0);

return color;
}

technique Technique1
{
    pass Pass1
    {
        PixelShader = compile ps_2_0 PixelShaderFunction();
    }
}
This shader is not much different than what we've done so far. The shader itself is just checking if the y coordinate is greater than some value. If so, zero out the pixel. The only thing different here is the variable we're comparing against, param1.
At the top of our shader file you can see we're now declaring a variable
float param1;
The only line that should appear new to you at this point is in our Draw() method:
effect.Parameters["param1"].SetValue(.7f);
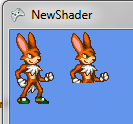
And that's all it takes to pass parameters to your shader functions. You can test by changing the above line to:
effect.Parameters["param1"].SetValue(.3f);
and you should see:
Passing Textures
Where it gets really interesting is passing in textures. I'm going to start my showing a similar rainbow effect from part2. In our Game class we're going to need to add a new Texture2D:

In your Draw() method replace the parameter we were passing before with the following:
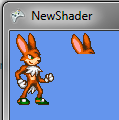
effect.Parameters["rainbow"].SetValue(rainbow);
rainbow being the Texture2D object from the image above.
at the top of our .fx file we're going to remove our old param1 declaration and add the following two lines:
texture rainbow;
sampler rainbow_sampler = sampler_state{Texture = rainbow;};
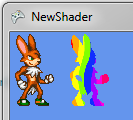
We're going to be passing in the texture, stored in rainbow then converting it into a sampler that can be used by tex2D. In our PixelShaderFunction we're going to have the following:
float4 color = tex2D(s0, coords);
float4 rainbow_color = tex2D(rainbow_sampler, coords);

if (color.a)
    return rainbow_color;
You can see we're using the same coords the get the colors for each sampler then if the pixel for our main is non transparent we return the pixel from the new texture at the same coordinates. This will give you the following result:
RenderTargets, Additive Blending, and Lights! Oh my!
So a lot of people have been reading this series just to get to this point. This series is primarily about HLSL shaders but in this segment I'm going to introduce you to a couple new features in XNA, not specific to HLSL or Shaders in general. We're going to again start out with the code. I've commented the relevant sections.
public class Game1 : Microsoft.Xna.Framework.Game
{
    GraphicsDeviceManager graphics;
    SpriteBatch spriteBatch;

    Texture2D lightMask;
    Texture2D surge;

    RenderTarget2D lightsTarget;
    RenderTarget2D mainTarget;

    Effect lightingEffect;

    public Game1()
    {
        graphics = new GraphicsDeviceManager(this);
        Content.RootDirectory = "Content";
    }

    protected override void LoadContent()
    {
        spriteBatch = new SpriteBatch(GraphicsDevice);

        lightMask = Content.Load<Texture2D>("lightmask");
        surge = Content.Load<Texture2D>("surge");

        lightingEffect = Content.Load<Effect>("Effect1");

        var pp = GraphicsDevice.PresentationParameters;
        lightsTarget = new RenderTarget2D(
            GraphicsDevice, pp.BackBufferWidth, pp.BackBufferHeight);
        mainTarget = new RenderTarget2D(
            GraphicsDevice, pp.BackBufferWidth, pp.BackBufferHeight);
    }

    protected override void Draw(GameTime gameTime)
    {

        // Create a Light Mask to pass to the pixel shader
        GraphicsDevice.SetRenderTarget(lightsTarget);
        GraphicsDevice.Clear(Color.Black);
        spriteBatch.Begin(SpriteSortMode.Immediate, BlendState.Additive);
        spriteBatch.Draw(lightMask, new Vector2(0,0), Color.White);
        spriteBatch.Draw(lightMask, new Vector2(100, 0), Color.White);
        spriteBatch.Draw(lightMask, new Vector2(200, 200), Color.White);
        spriteBatch.Draw(lightMask, new Vector2(300, 300), Color.White);
        spriteBatch.Draw(lightMask, new Vector2(500, 200), Color.White);
        spriteBatch.End();

        // Draw the main scene to the Render Target
        GraphicsDevice.SetRenderTarget(mainTarget);
        GraphicsDevice.Clear(Color.CornflowerBlue);
        spriteBatch.Begin();
        spriteBatch.Draw(surge, new Vector2(100, 0), Color.White);
        spriteBatch.Draw(surge, new Vector2(250, 250), Color.White);
        spriteBatch.Draw(surge, new Vector2(550, 225), Color.White);
        spriteBatch.End();

        // Draw the main scene with a pixel
        GraphicsDevice.SetRenderTarget(null);
        GraphicsDevice.Clear(Color.CornflowerBlue);
        spriteBatch.Begin(SpriteSortMode.Immediate, BlendState.AlphaBlend);
        lightingEffect.Parameters["lightMask"].SetValue(lightsTarget);
        lightingEffect.CurrentTechnique.Passes[0].Apply();
        spriteBatch.Draw(mainTarget, Vector2.Zero, Color.White);
        spriteBatch.End();

        base.Draw(gameTime);
    }
}
Alright, this might seem like a pretty big step where we're coming from but lets break it down into the main talking points. First we have a new texture we haven't used before:

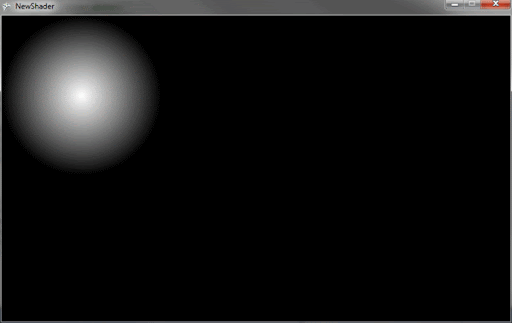
This doesn't have to have a black background, it can be a white to transparent gradient, but that wouldn't show up well on the blog and black will work fine. We'll get to how we make use of this texture in a moment.
RenderTarget2D
You've probably noticed I've used two render targets here. A super high level overview of render targets is something other than the back buffer that you can draw to and then use as a texture. This allows us to use spritebatch to create our own textures in real-time.
The key points to using a render target are instantiating a RenderTarget2D object:
var pp = GraphicsDevice.PresentationParameters;
lightsTarget = new RenderTarget2D(
    GraphicsDevice, pp.BackBufferWidth, pp.BackBufferHeight);
and using the render target. To use the render target you just have to call:
GraphicsDevice.SetRenderTarget(lightsTarget);
When you're done drawing to a render target you should call the above code again, this time passing null.
GraphicsDevice.SetRenderTarget(null);
That will cause all additional Draw calls to resume drawing to the back buffer.
Additive Blending
The other new feature I've introduced, specifically in the lighting render target, is the use of AdditiveBlending with our sprite batch call. This will allow us to draw our light gradient multiple times in overlapping areas adding to the effect where multiple partially white areas overlap. You can see the effect demonstrated below as I add more and more light sources:
Bringing it together
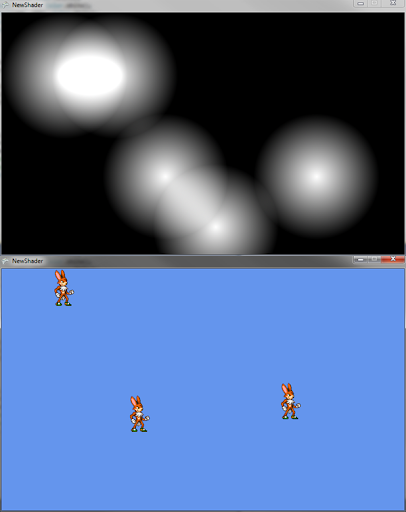
With those hurdles out of the way I can begin describing exactly how this all works. If you look back at the Draw method you can see I've broken the method into three main sections. We have a render target drawing the light mask and a render target drawing our main scene. If I were to Draw each of these targets separately you'd see the following respectively:
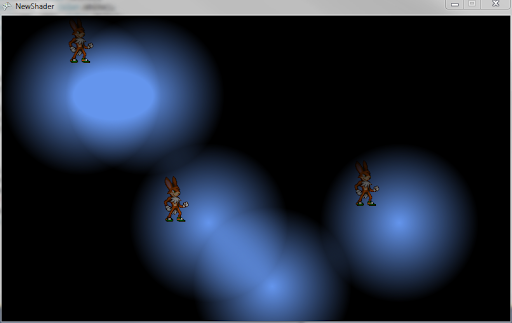
In the last section you can see that we're not just drawing one specific target. We're drawing the main target and passing the lights target into our pixel shader. The code for that pixel shader is as follows:
sampler s0;
texture lightMask;
sampler lightSampler = sampler_state{Texture = lightMask;};

float4 PixelShaderFunction(float2 coords: TEXCOORD0) : COLOR0
{
    float4 color = tex2D(s0, coords);
    float4 lightColor = tex2D(lightSampler, coords);
    return color * lightColor;
}
Most of this should look familiar to you from earlier in the lesson. When we multiply the textures together anywhere that's white (1) will leave the color alone. Anywhere that's black (0) will become black. Obviously any gray bits will slightly tint the color depending on how gray it is. And with that you can see the final result:
Conclusion
There was a lot to take in from this lesson but in the ended you can see that it's not too difficult to implement real time blending of lights sources to make pretty cool effects with XNA using pixel shaders. You'll probably want to play with the gradient to get the desired effect your after. Also try having a light source follow your mouse to see the real-time blending in action. I hope you've all enjoyed with series and I'd be glad to answer any questions anyone might have.