My First 2D Pixel Shader(s)
Part 1 - Setup & Grayscale
In this post I plan to show you how to setup the most simple of pixel shaders using HLSL with XNA 4.0. In addition to the code here you can find some full examples on BitBucket. Feel free to fork and push back more examples.
For a quick view on the shaders i’ll be implementing you can take a look at:
If you’re still interested, lets start with the most basic shader possible. Start a new Windows Game (4.0) Project in Visual Studio. I’m going to be using a single texture, , cropped from a spritemap found on opengameart.org. Links to the resources are listed at the end of this post. We don’t really need a background for the purpose of the exerise but feel free to implement it yourself.
Setting Up
The first thing we’ll want to do add our texture to our project. Go ahead and add the texture you chose to the Content Pipeline. After that add a new member to the class of
Texture2D texture;Then in yout LoadContent method add the following line at the end substituting your assets name:
texture = Content.Load<Texture2D>("surge")Now lets go ahead and Draw it just to make sure everything is working as expected. Add the following to your Draw method right above base.Draw();
spriteBatch.Begin();
spriteBatch.Draw(texture, new Vector2(0, 0), Color.White);
spriteBatch.End();
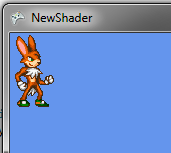
Now hit F5 and make sure everything looks compiles and looks okay. If you’re following along it should look something like this:

Assuming everything looks as expected you can go ahead and move forward.
Adding the Shader
No we’re going to have to an effect file to the project. This is programmed in a language called High Level Shader Language (HLSL). Without going into too much detail about how HLSL works we’re going to dive right in. There’s some magic you won’t understand at first but that shouldn’t stop you from making some really cool effects.
Go ahead and right click on your Content Project and click Add -> New Item. Select “Effect File”. At first glance this file can be a little scary but by default it’s meant for apply shaders for 3D objects. We can go ahead and rip out all the top level variable declarations and Vertex structures and functions. At the absolute minimum our effect file should like like this:
float4 PixelShaderFunction(float2 coords: TEXCOORD0) : COLOR0
{
    return float4(1, 0, 0, 1);
}

technique Technique1
{
    pass Pass1
    {
        PixelShader = compile ps_2_0 PixelShaderFunction();
    }
}
Go ahead and copy the code right into your Effect1.fx file as this will be our first shader. We’ll talk a bit about what it does in a minute. Lets get this shader working in our code first. Back in our Game1.cs we’re going to need to add member variable to load the Effect just like we did with the image. Add a member variable of:
Effect effect;And in your LoadContent method add the following line:
effect = Content.Load<Effect>("Effect1");The rest of our changes will be in the Draw method. First we’re going to have to update our spriteBatch.Begin() call to use a new sort mode.
spriteBatch.Begin(SpriteSortMode.Immediate, BlendState.AlphaBlend);You can look up the details of these options in the MSDN Reference. SpriteSortMode.Immediate is required to apply the effect. BlendState.AlphaBlend is the default. After your Begin call we’re going to add the following line which will Apply the pixel shader to the sprite.
effect.CurrentTechnique.Passes[0].Apply();Basically this is saying to apply the first pass of the current technique to everything else I draw during this spriteBatch. We’ll talk briefly about this when we go over the Effect1.fx file.
At this point you have a working Pixel Shader example. Just in case you got lost along the way your minimal Game1.cs should look very similiar to this:
namespace NewShader
{
    public class Game1 : Microsoft.Xna.Framework.Game
    {
        GraphicsDeviceManager graphics;
        SpriteBatch spriteBatch;

        Texture2D texture;
        Effect effect;

        public Game1()
        {
            graphics = new GraphicsDeviceManager(this);
            Content.RootDirectory = "Content";
        }

        protected override void LoadContent()
        {
            spriteBatch = new SpriteBatch(GraphicsDevice);
            texture = Content.Load<texture2d>("surge");
            effect = Content.Load<effect>("Effect1");
        }

        protected override void Draw(GameTime gameTime)
        {
            GraphicsDevice.Clear(Color.CornflowerBlue);

            spriteBatch.Begin(SpriteSortMode.Immediate, BlendState.AlphaBlend);
            effect.CurrentTechnique.Passes[0].Apply();
            spriteBatch.Draw(texture, new Vector2(0, 0), Color.White);
            spriteBatch.End();

            base.Draw(gameTime);
        }
    }
}
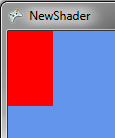
When we hit F5 you’ll see your effect in action!

Hmm, that’s not very exciting… Let go look at the Effect file.
Anatomy of a pixel shader…
So there’s only about 5 real lines in here. Lets see if we can disect what’s happening. We’ll start at the bottom:
technique Technique1
{
    pass Pass1
    {
        PixelShader = compile ps_2_0 PixelShaderFunction();
    }
}
This should be pretty self explanitory for the most part considering how we applied the effect in our Game1.cs file. It would appear that you can have multiple Techniques and Passes. For this article we’re going to always be using one of each so we’ll save that for another lesson. The last line might be a bit confusing. It’s basically just telling the compiler what version of HLSL to use to compile the function you declared above. That seems easy enough. Now we can take a look at the real action. The pixel shader we defined is:
float4 PixelShaderFunction(float2 coords: TEXCOORD0) : COLOR0
{
    return float4(1, 0, 0, 1);
}
You can tell this looks very similar to C/C# but there are definitely some nuances. Right away you probably notice the TEXCOORD0 and COLOR0. These are called semantics. We’ll gloss over the details and I’ll just say that TEXCOORD0 being assigned to a type of float2 is basically telling you that you’ll be receiving a 2 point (x,y) coordinate. This is going to be the location of the pixel the shader is currently operating on. Anything you do in this function will be applied to every pixel of the texture you drew. As you probably noticed we’re not even doing anything with coords. You actually don’t even need to have that parameter and you’d have had an even cleaner looking effect file but I felt it was worth explaining.
Next, COLOR0 is an output semantic. What you return will be treated as a color. We’re not really doing much here. We’re returning a float4. If you guessed that this was a 4 point vector than you guessed right. The values passed to the contructor represent RGBA. You should have figured out by now that our pixel shader returned a opaque red pixel for every pixel it processed and now it should make sense why we have a red rectangle.
Before we can make something useful I’m going to introduce you to a new type and your first intrinsic function. First at the very top of our file we’re going to add the following line:
sampler s0;Your texture is going to be automagically loaded into this variable for you so you don’t have to worry about that at all. Next we’re going to replace the entire body with the following code:
float4 color = tex2D(s0, coords);
return color;
tex2D is going to return a vector4 containing RGBA for the pixel on the texture in s0 at the coordinates coords. Then we return that color. If you hit F5 you’ll see we’re right back where we started!

Alright, so again that’s not really that cool. We used a pixel shader to get the color of each pixel and return that pixel unmodified. We’re on the right track but lets get started with our first effect.
Grayscale
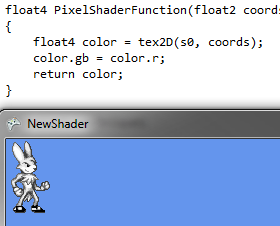
I’m about to wrap up part 1 of this tutorial but I don’t want to leave you empty handed. Lets take our image and make it grayscale. This is super simple. We’re just going to take the value of R in color and apply it to G and B. There’s some really cool construct here for modifying values in these vectors which you’re about to see in action. Right before we return the color in our pixel shader function add the following line:
color.gb = color.r;Hit F5 and see the magic.

Obviously there’s going to be more complicated algorithms for grayscale but who cares! Look how easy that was.
Conclusion
We got a brief introduction to Pixel Shaders today and I hope it was easy for you to get your first effect running. In the next part I’m going to introduce you to some more complicated effects that we can jump right in to now that you have a foundation. If you want to see some simple pixel shaders I’ve already thrown together take a look at the BitBucket repository I linked at the top and feel free to contribute!
Resources: Background and Character